

![]()
![]()
![]()
![]()
![]()
![]()
![]()
- What is the difference between FindLeak and the FindLeak Demo?
- Although I entered the license key correctly, FindLeak indicates that the activation was not successful. Why?
- Can FindLeak be used simultaneously with other tools for finding memory leaks?
- A glance at the system monitor shows me that the memory requirement of the examined process is increased, although there are no memory leaks in this process. What's the reason for that?
- FindLeak always shows me all started processes. However I would like to examine only certain processes.
- How can I exclude processes from being monitored by FindLeak?
- How can I accelerate my work with FindLeak?
- I am unable to follow the FindLeak workshop, as my debugger doesn't seem to break at breakpoints.
What is the difference between FindLeak and the FindLeak Demo?
With FindLeak's demo version you can only debug the included demo project. Apart from that, none of the other features have been restricted.
Although I entered the license key correctly, FindLeak indicates that the activation was not successful. Why?
FindLeak uses a licensing mechanism, which generates an unique identification key in dependance of the hardware configuration of your computer. This identification is thus computer specific. According to this identification we generate a license key, which activates your version of FindLeak on just the computer on which the identification key was produced. If the activation fails, this can be because of the fact that the hardware configuration of this computer has been changed fundamentally. In this case please contact our sales department via telephone ( +49 (7244) 73 41 13 ) or per mail: sales@findleak.de in order to request a new license key.
Can FindLeak be used simultaneously with other tools for finding memory leaks?
No. Due to the internal structure of such tools this is not possible. You can use only one of these tools at a certain time.
A glance at the system monitor shows me that the memory requirement of the examined process is increased, although there are no memory leaks in this process. What's the reason for that?
While FindLeak is active, it increases the memory requirement of the examined process and lets it also rise, if no memory leaks
exist.
An examination of the memory requirement of a process with the system monitor or task manager does only make sense when
FindLeak is not active.
FindLeak attaches itself onto each starting process. However I would like to examine only certain processes.
You can set up FindLeak to only attach to pre-defined processes in two steps:
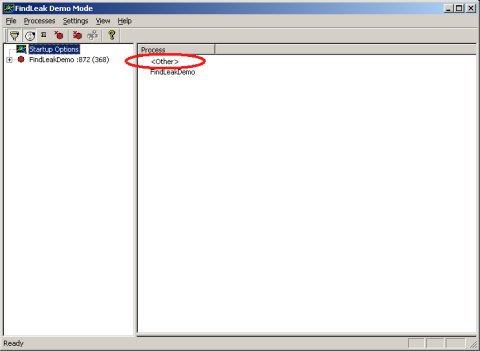
1. Select "Startup Options" in the process tree of FindLeak's main window. Then double-click on the "<OTHER>" entry in the list view on the right hand side (see below).
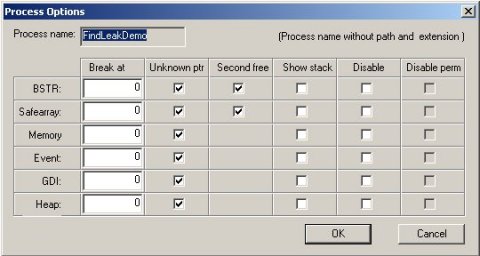
The now appearing process options window allows you set the default startup options for each process. Default options only apply to processes, for which no startup options were defined otherwise. In the dialog box, disable monitoring for all resource types by checking the appropriate "Disable perm" (disable permanently) boxes, as depicted in the picture below. With that, monitoring for processes without specific process startup options is disabled.
2. Define process specific startup options for the process you would like to monitor by adding a new entry to the startup options list. Make sure to enter a matching process name in the process options window and restart FindLeak.
How can I exclude processes from being monitored by FindLeak?
Either you click on the "Attach process" button (on the left side, s. fig.):
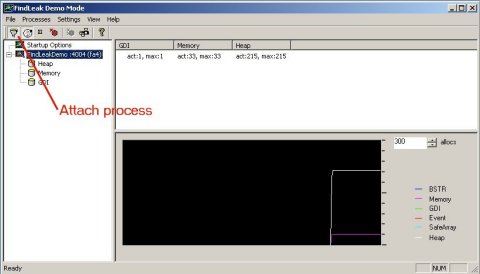
or you select the menu option "Attach process" in the "Settings" menu, so that the checkmark
before this menu option disappears. Further processes, which are started after changing this setting,
are excluded from being monitored by FindLeak.
You can reset this setting at any time to the default setting (monitoring of all processes) by clicking
again on "Attach process". Processes, which are started thereafter, will be monitored by FindLeak again.
How can I accelerate my work with FindLeak?
First hint: Click on the "Cyclic update" button (s. fig.):
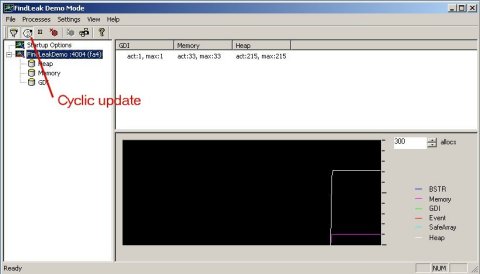
or you click on the menu option "Cyclic update" "in the "Settings" menu, so that the checkmark
before this entry disappears. From now on the refresh of the list view (display of all new memory allocations) is
disabled. This action increases the operating speed significantly, since your computer is no more stressed by
constantly redrawing the list view.
if you click a second time on this menu option or on the appropriate icon, the cyclic update will be reactivated again.
Second hint: In order to improve the performance, you can divide the investigation of memory allocations into two steps:
First deactivate the memory type "heap" and examine then whether memory leaks arise or not. If leaks do not arise within
the remaining memory types, disable the monitoring of all memory types with the exception of "heap". Then examine again.
The performance of the overall system can also decrease, if you examine memory allocations in detail view when simultaneously the
cyclic update of the list view is activated.
I am unable to follow the FindLeak workshop, as my debugger doesn't seem to break at breakpoints.
The FindLeak demo application was compiled using Microsoft's Visual C++ 6.0 with Service Pack 5. In order to follow the workshop, you will need to use the same development environment (e.g. Microsoft VC++ 6.0 SP 5).
Home | Memory Leaks | Download Demo | Order FindLeak | Legal Terms | Imprint
Responsible for the content of this web site:
cjt Systemsoftware AG.
Copyright © 2003 cjt Systemsoftware AG. All rights reserved